No items found.
Free Webinar · May 7 · How to Get (and Keep) More Patients as a Practitioner →
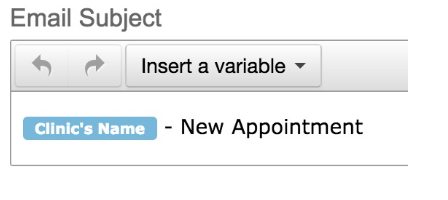
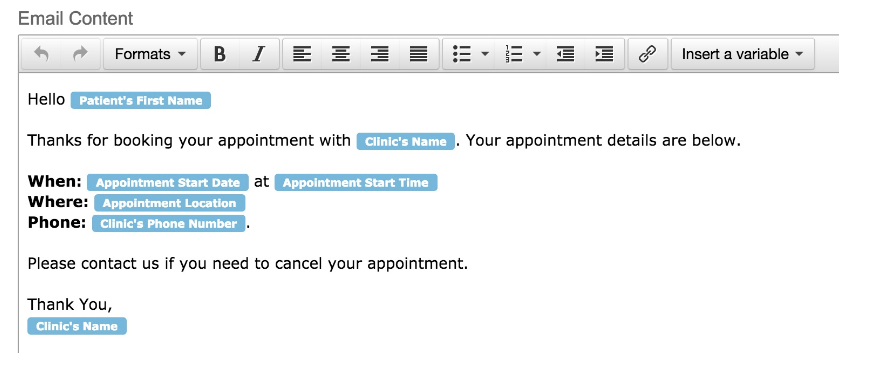
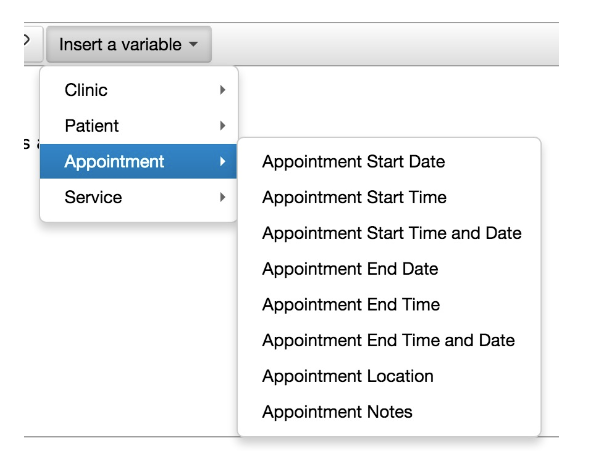
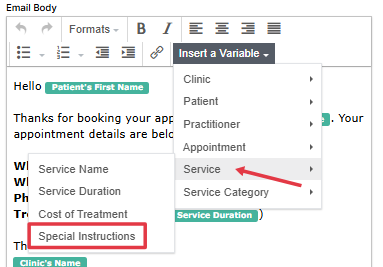
Save Your SpotIn Noterro, you can customize the emails, text messages, and phone calls sent to your Patient. This lets you personalize the notifications and provide relevant information to your Patients. This article will guide you through editing Patient Notification templates.
To edit a Patient Notification template such as an email or text message reminder notification, follow these steps:
Important Note: If you edit Notification Templates, you will be asked to verify your email address. To verify your email address, please send an email to Support@Noterro.com.
Important Note: By editing the Patient Notification templates, you can ensure that the messages sent to your Patients are tailored to their needs and provide them with the necessary information. Review and update the templates regularly to keep them up-to-date and relevant.
For both Appointments and Classes, you can control whether or not you want Email, SMS, or Phone reminders to be enabled by default when booking an appointment as a staff member. For each sending method (Email, SMS, Phone), the reminder will be enabled by default if the default value is enabled. To enable or disable reminder default settings, follow these steps:
Important Note: If the reminder default settings are enabled, you can still disable the reminder on a per-appointment basis.
Replies to emails by default are sent to noreply@noterro.com. You can enable the Reply-To feature, which overrides this to your clinic email instead. However, this can cause some emails to be marked as junk, so do not use this feature if your Patients have problems with emails being delivered to spam. To enable this feature, you can locate it at the bottom of the Templates page.
Important Note: If you're unable to edit or save changes to your Patient Notification Templates, please email support@noterro.com.
In Noterro, you can customize the emails, text messages, and phone calls sent to your Patient. This lets you personalize the notifications and provide relevant information to your Patients. This article will guide you through editing Patient Notification templates.
To edit a Patient Notification template such as an email or text message reminder notification, follow these steps:
Important Note: If you edit Notification Templates, you will be asked to verify your email address. To verify your email address, please send an email to Support@Noterro.com.
Important Note: By editing the Patient Notification templates, you can ensure that the messages sent to your Patients are tailored to their needs and provide them with the necessary information. Review and update the templates regularly to keep them up-to-date and relevant.
For both Appointments and Classes, you can control whether or not you want Email, SMS, or Phone reminders to be enabled by default when booking an appointment as a staff member. For each sending method (Email, SMS, Phone), the reminder will be enabled by default if the default value is enabled. To enable or disable reminder default settings, follow these steps:
Important Note: If the reminder default settings are enabled, you can still disable the reminder on a per-appointment basis.
Replies to emails by default are sent to noreply@noterro.com. You can enable the Reply-To feature, which overrides this to your clinic email instead. However, this can cause some emails to be marked as junk, so do not use this feature if your Patients have problems with emails being delivered to spam. To enable this feature, you can locate it at the bottom of the Templates page.
Important Note: If you're unable to edit or save changes to your Patient Notification Templates, please email support@noterro.com.


.webp)
No credit card required. Available 1-on-1 support.
.webp)
No credit card required. Available 1-on-1 support.
.webp)
.webp)