No items found.
Free Webinar · May 7 · How to Get (and Keep) More Patients as a Practitioner →
Save Your SpotAs a Noterro user, you have the ability to manage your TELUS eClaims connections. This feature lets you connect with TELUS eClaims and streamline claims processing. In this article, we will guide you through adding, editing, disabling and deleting TELUS eClaims connections.
When you integrate with TELUS eClaims through Noterro, you will no longer have to access the TELUS portal to process claims. It can all be done through Noterro. You can check Eligibility or Submit a claim. Once you successfully submit a claim through TELUS eClaims, it and the Explanation of Benefits will be added. All you will need to do is mark the claim paid. Let's dive in!
To add a TELUS eClaims connection in Noterro, follow these steps:
Important Note: To delete a connection, click Edit in the connection section and then Remove. You can also update your connection settings at any time by clicking Edit.
You will need to connect all the Users in your clinic with whom you want to interact with TELUS eClaims. If you are an Organization, you will need to enter all the appropriate TELUS Provider IDs for the Users listed in your Noterro account.
Important Note: After the Users have been connected, you can access their settings by clicking Manage Users.
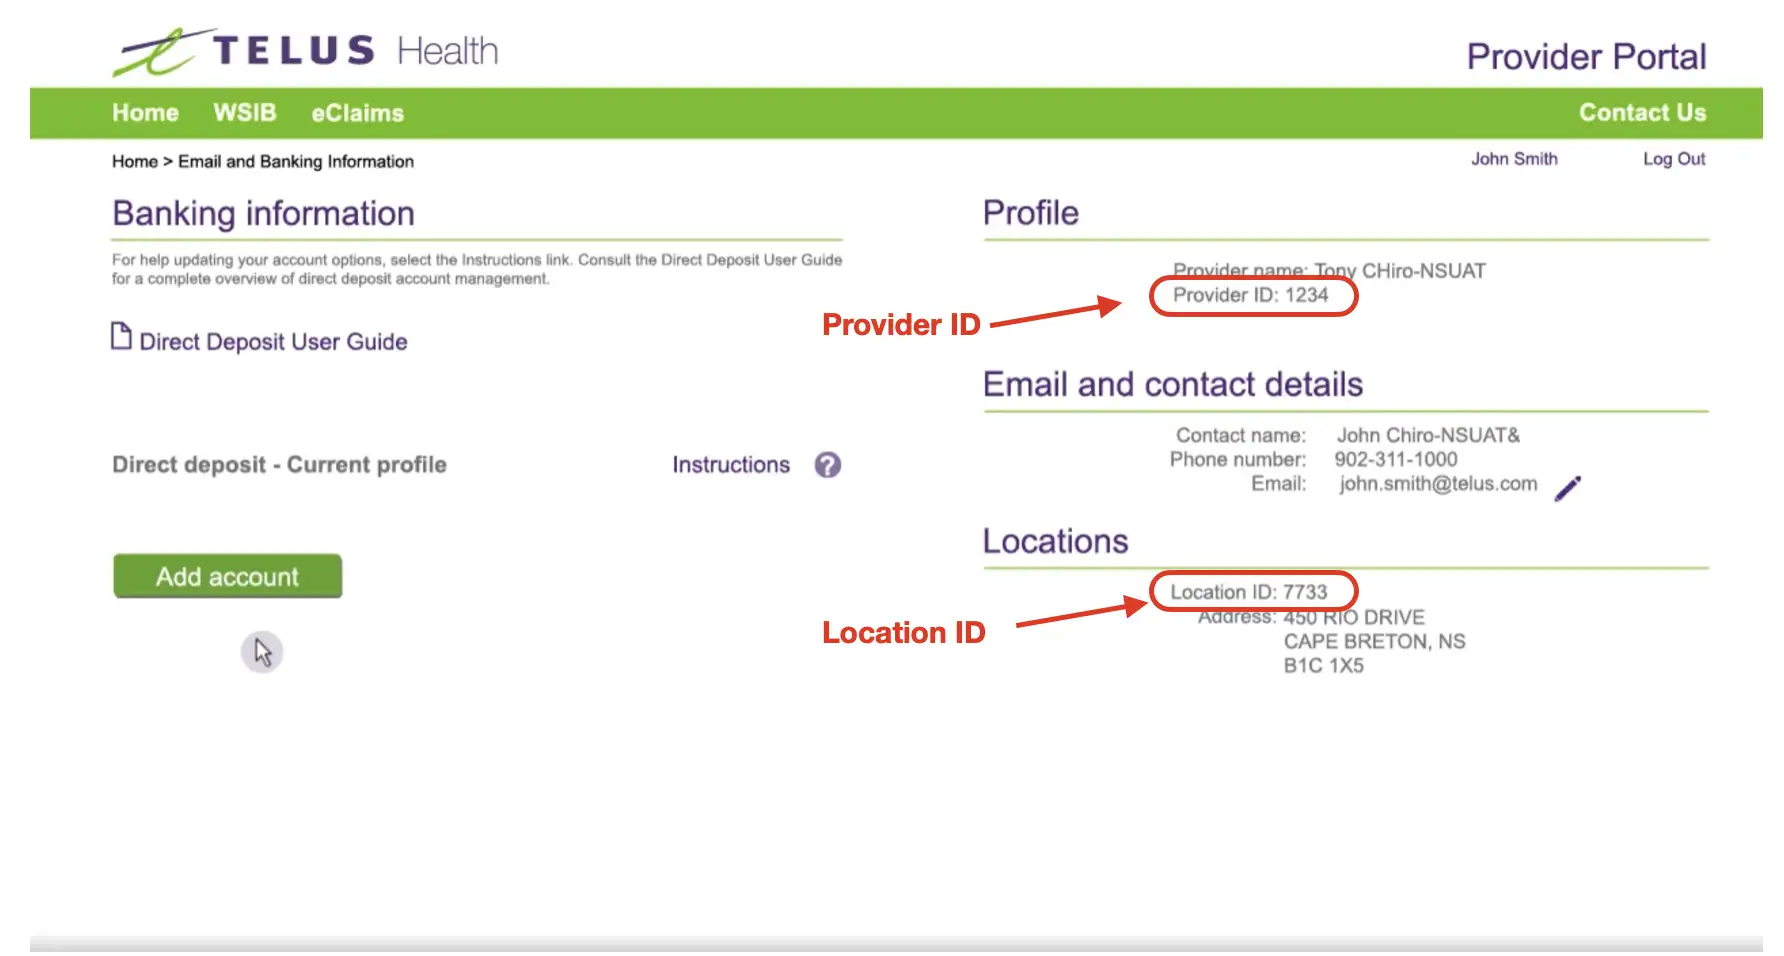
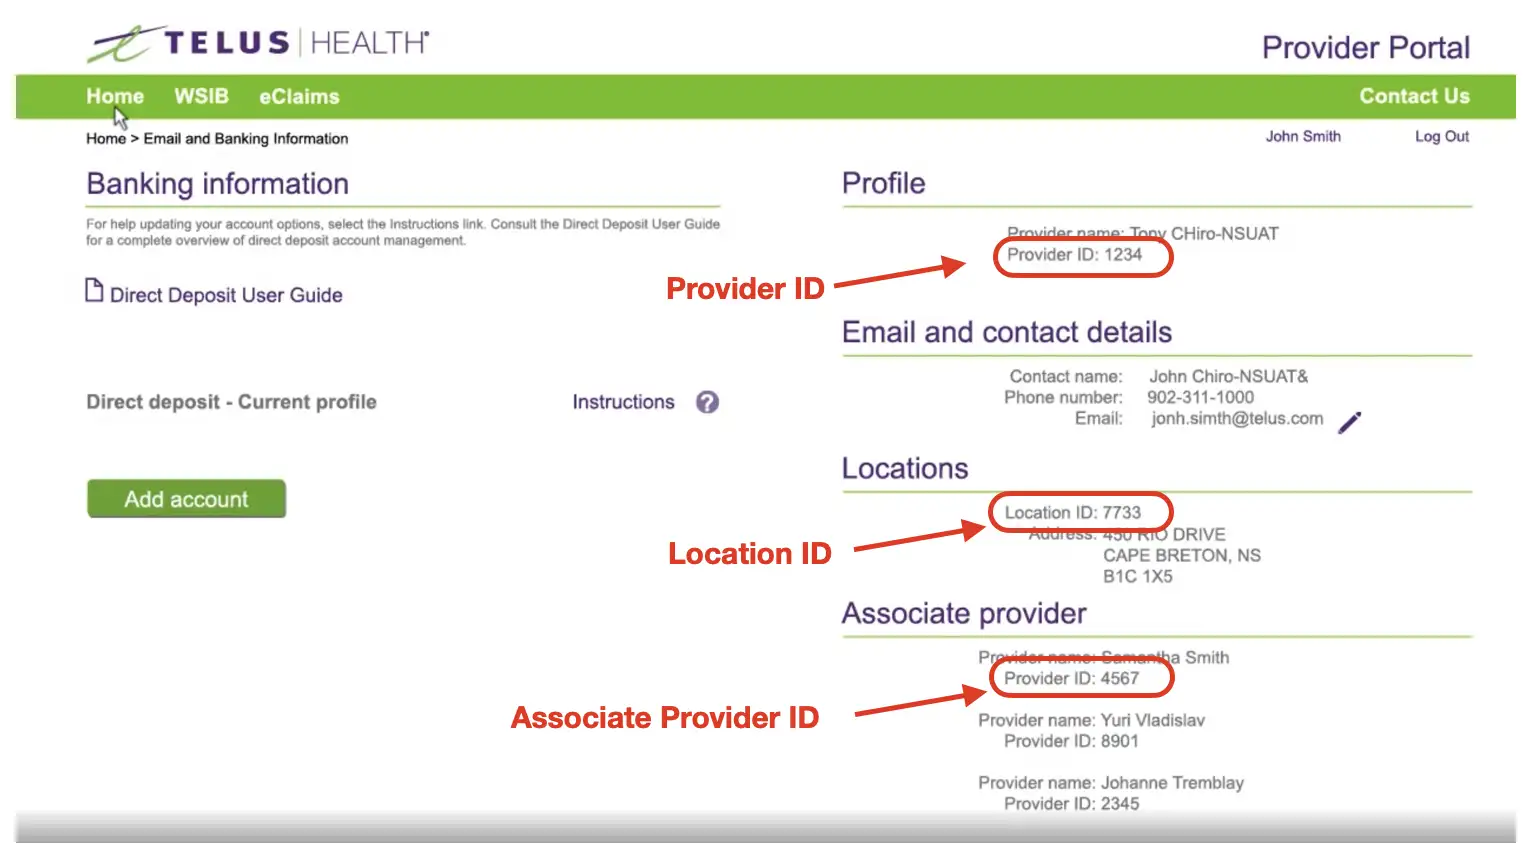
Here is a list of values you need to obtain from your TELUS eClaims account and where to find them.
If you're registered with TELUS Health as an Organization, follow these steps:
This is a 5-7 digit number issued by TELUS Health. To find your Location ID, follow these steps:
This is the same username you use to log into the eClaims portal. TELUS Health eClaims usernames have a specific format, for example, XX0000123456.
This is the same password you use to log in to the TELUS Health eClaims portal. If you change your TELUS eClaims password, you'll also need to update this in Noterro.
Enter your first and last name exactly as they appear in your TELUS Health eClaims account.
Use the name listed under the Associate Provider section of the TELUS Health eClaims portal.
This is the license number issued by the provider’s college or association. The license number entered should match what was provided to TELUS during the initial registration process. If there are leading zeroes or spaces in the license number, you will need to include them. Note that the Licence ID is not displayed on the TELUS eClaims portal.
This will be a 4-7 digit number. Follow the steps below to find a Provider CPR ID:
These are your active insurers, showing their TELUS eClaims details. Map your active insurers to TELUS to see their compatibility and to submit claims successfully. Those marked for Eligibility Checks mean the insurer can perform real-time eligibility checks through TELUS eClaims.
From learning how to submit claims and receive payments, promoting eClaims to your Patients, and getting one-on-one training—it’s all here.
Please click on the link below.
English: https://plus.telushealth.co/page/eclaims/resources-api/
French: https://plus.telussante.co/page/ereclamations/ressources-api/
Coordination of benefits applies when a Patient is covered under more than one plan, either with a single insurance company or with multiple insurers. Coordination rules determine which insurer or plan pays first and which one(s) pay(s) subsequently.
You can use coordination of benefits if both the primary and secondary coverage are under the same insurance company and through an insurer that supports coordination of benefits. When you submit the coordination request, only the primary is processed in real-time; the second claim is processed manually and sent to the recipient member. Currently, coordination of benefits is only supported for different insurers if the Patient's coverage is with Canada Life and Claims Secure.
The Secondary coverage section is optional because not all patients have secondary coverage. However, if the Patient does have secondary coverage, this section must be completed so that this information can be provided to the primary insurer for claim adjudication.
When both spouses have their coverage, primary and secondary coverage are determined using the following guidelines:
If you experience errors while attempting to process an eligibility check or claim, check out the explanation of common TELUS eClaims Error Messages.
As a Noterro user, you have the ability to manage your TELUS eClaims connections. This feature lets you connect with TELUS eClaims and streamline claims processing. In this article, we will guide you through adding, editing, disabling and deleting TELUS eClaims connections.
When you integrate with TELUS eClaims through Noterro, you will no longer have to access the TELUS portal to process claims. It can all be done through Noterro. You can check Eligibility or Submit a claim. Once you successfully submit a claim through TELUS eClaims, it and the Explanation of Benefits will be added. All you will need to do is mark the claim paid. Let's dive in!
To add a TELUS eClaims connection in Noterro, follow these steps:
Important Note: To delete a connection, click Edit in the connection section and then Remove. You can also update your connection settings at any time by clicking Edit.
You will need to connect all the Users in your clinic with whom you want to interact with TELUS eClaims. If you are an Organization, you will need to enter all the appropriate TELUS Provider IDs for the Users listed in your Noterro account.
Important Note: After the Users have been connected, you can access their settings by clicking Manage Users.
Here is a list of values you need to obtain from your TELUS eClaims account and where to find them.
If you're registered with TELUS Health as an Organization, follow these steps:
This is a 5-7 digit number issued by TELUS Health. To find your Location ID, follow these steps:
This is the same username you use to log into the eClaims portal. TELUS Health eClaims usernames have a specific format, for example, XX0000123456.
This is the same password you use to log in to the TELUS Health eClaims portal. If you change your TELUS eClaims password, you'll also need to update this in Noterro.
Enter your first and last name exactly as they appear in your TELUS Health eClaims account.
Use the name listed under the Associate Provider section of the TELUS Health eClaims portal.
This is the license number issued by the provider’s college or association. The license number entered should match what was provided to TELUS during the initial registration process. If there are leading zeroes or spaces in the license number, you will need to include them. Note that the Licence ID is not displayed on the TELUS eClaims portal.
This will be a 4-7 digit number. Follow the steps below to find a Provider CPR ID:
These are your active insurers, showing their TELUS eClaims details. Map your active insurers to TELUS to see their compatibility and to submit claims successfully. Those marked for Eligibility Checks mean the insurer can perform real-time eligibility checks through TELUS eClaims.
From learning how to submit claims and receive payments, promoting eClaims to your Patients, and getting one-on-one training—it’s all here.
Please click on the link below.
English: https://plus.telushealth.co/page/eclaims/resources-api/
French: https://plus.telussante.co/page/ereclamations/ressources-api/
Coordination of benefits applies when a Patient is covered under more than one plan, either with a single insurance company or with multiple insurers. Coordination rules determine which insurer or plan pays first and which one(s) pay(s) subsequently.
You can use coordination of benefits if both the primary and secondary coverage are under the same insurance company and through an insurer that supports coordination of benefits. When you submit the coordination request, only the primary is processed in real-time; the second claim is processed manually and sent to the recipient member. Currently, coordination of benefits is only supported for different insurers if the Patient's coverage is with Canada Life and Claims Secure.
The Secondary coverage section is optional because not all patients have secondary coverage. However, if the Patient does have secondary coverage, this section must be completed so that this information can be provided to the primary insurer for claim adjudication.
When both spouses have their coverage, primary and secondary coverage are determined using the following guidelines:
If you experience errors while attempting to process an eligibility check or claim, check out the explanation of common TELUS eClaims Error Messages.


.webp)
No credit card required. Available 1-on-1 support.
.webp)
No credit card required. Available 1-on-1 support.
.webp)
.webp)